Hi guys
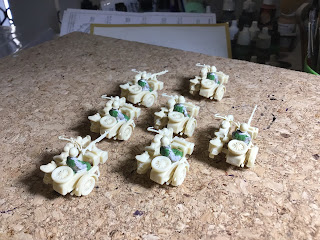
I’m trying to make these troops with as little green stuff as I can for those who struggle with GS, however, it is inevitable that I will have to use some GS, the steps I have taken here are
1) added helmeted heads, cut from plastic figures, drilled a hole in the neck of both the head and body and glued a length of paper lip into the head with superglue, then glued into the body.
2) added the lower area of the rubberised greatcoat, it could be fastened around the legs like a jumpsuit, for making riding easier.
3) Added wire, then green stuff to some arms, if the arm is close to the body I just use GS without a wire.
4) added the raincoat flap across the back of the shoulders with GS.
5) added the leather strap for goggles around the helmet with thinly cut paper and superglue.
6) to the sidecar passengers I have added the rear raincoat flap and extended any missing legs that I cut of to make the figures fit in the sidecar.
At this stage you could continue with adding arms, and gear, then calling them done, I will however go on to bulk out the chest and collar with GS, because that is how I personally prefer the figs.
Using Green stuff - it’s other name is kneadatite, or blue/yellow 2 part epoxy resin putty, it comes in either a ribbon with the blue and yellow putty joined in the middle, or as 2 rolls 1 blue 1 yellow, I prefer the 2 rolls, as the ribbon sometimes hardened in the middle where the 2 colours join, between jobs keep the putty in a zip lock bag in your fridge, if it’s left out to long the yellow putty can develop a skin that is a pain because it causes lumps in your putty, when mixing I use 60% yellow and 40% blue, the reason is the more blue you add, the more stiff, and less sticky the putty is, it also hardens quicker, I like it to be very sticky at the start, and want a long working time.
I make a small ball of putty and stick it to my left thumbnail, this is my pallet, I then use a hobby knife with an old blunt blade (must have it’s pointy tip though) and I cut the amount of putty I need from the ball, I work on half a dozen figs at a time, and place a small amount of putty on the area of each figure where I’ll be working, I very quickly push the putty around to basically cover the area I’ll work, then move to the next figure, by the time I have used all the putty ball (I very really have wastage), I return to the first figure, the time it has been sitting has allowed the putty to adhere to the figure well, I use the hobby blade to push the putty around the area I’m working until it is the basic shape I want, to stop the putty from sticking to the blade I will often lick the blade to add moisture, you could also have a little cup of water to dip the blade in, I then use a wet finger to run over the area and smooth it out of finger prints etc, or a wet blade for areas to small for my fingers, I then either use the sharp end of the blade or a pin to add creases and wrinkles on the inside of the knees and elbows. At this stage the professionals use oil and brushes to smooth out the putty, I do not do this however, as it adds the step of thoroughly cleaning everything before commencing with the next area on the fig, an alternative is to use a brush and water, once you finish that area on those half dozen figs I move to the next batch of figures, and so on, buy the time I get back to the first batch, around 40min, the putty has dried enough to handle, I then start a new area on that first batch, I continue this until finished or I need to stop, the size of the are I’ll work on each time is usually a limb, or the front or back of the torso.


No comments:
Post a Comment